How to Create a Button Widget and Use It
Configuring the Button Widget
To configure the Button Widget, follow these steps:
- Add the Button Widget: Drag and drop the Button Widget icon from the toolbox onto the design panel. You can also use the search function within the toolbox if needed. Adjust the widget’s dimensions to meet your requirements.
- View Properties: Click on the Properties button in the configuration panel’s property pane to visualize the Button Widget’s settings.
Basic Configuration
Tooltip
- Add a Tooltip: In the Basic settings, enhance the Button Widget by adding a tooltip, which is brief content displayed when the user hovers over the widget. There are no restrictions on the text length.
Border
- Enable Border: Activate the Border option in the Properties panel to frame the Button Widget. Customize the border’s color, thickness, and style. The default style is “Solid,” but it can be changed to “Dotted” or “Dashed.”
Text
- Text Settings: Modify the text appearance within the Button Widget.
- Text Content: Customize the default text.
- Color and Font Size: Adjust the text color and font size.
- Alignment: Set the Horizontal and Vertical Alignment for the text. Both alignments are centered by default but can be changed to left or right.
- Padding: Adjust the padding around the text (Top, Bottom, Right, and Left). All values are set to zero by default.
Icon Settings
Icon
- Add an Icon: The Icon option allows incorporation of an icon into the Button Widget. By default, this option is disabled.
- Icon Selection: Click the Icon dropdown for options like Right Arrow, Left Arrow, Undo, Redo, Help, and Information.
- Icon Customization: Change the icon’s color and size.
- Icon Placement: Set to “Custom” by default, allowing repositioning to left, right, above, or below the text.
- Icon Alignment: Fine-tune the icon’s position with Horizontal and Vertical Alignment settings available when set to “Custom.”
- Icon Padding: Adjust the Top, Bottom, Right, and Left padding for the icon, initially set to zero.
Enabling Background Color
To change the background color of a button widget:
- Navigate to the Fill section of the properties panel.
- Enable the Enable Background Color option.
- Select a color using the Background Color option.
- Adjust the transparency of the background color using the Transparency option in the same section.
Enabling Background Image
To set a background image for the button widget:
In the Fill section of the properties panel, enable the Enable Background Image option.
Choose the image type:
- Local: Select an image from your local device by browsing for it.
- URL: Enter the image URL in the Background Image URL text box.
Image Display Modes
The background image can be displayed in various modes, which can be selected in the Mode option within the Fill section:
- Default: The image will be displayed in its original size.
- Fill: The image will fill the available space of the button.
- Uniform to Fill: The image will uniformly occupy the space but may be clipped if it exceeds the control’s dimensions.
- Uniform: The image will resize proportionally (without clipping) to best fit the widget area.
Rotating the Background Image
Users can also rotate the background image according to their preference. The available rotation angles are:
- 0 degrees
- 90 degrees
- 180 degrees
- 270 degrees
By following these steps, users can effectively customize the appearance of button widgets to enhance their application’s user interface.
Actions
URL Filtering Action
This option in the button widget allows users to navigate to a specified link or dashboard when the widget is clicked.
There are two options available:
- Dashboard
- URL
Dashboard
In the dashboard section, users can select the dashboard they wish to navigate to using the button widget. The selected dashboard will be rendered using the same instance as the parent dashboard. Users can also pass filter details from the parent dashboard to the target dashboard.
How to configure
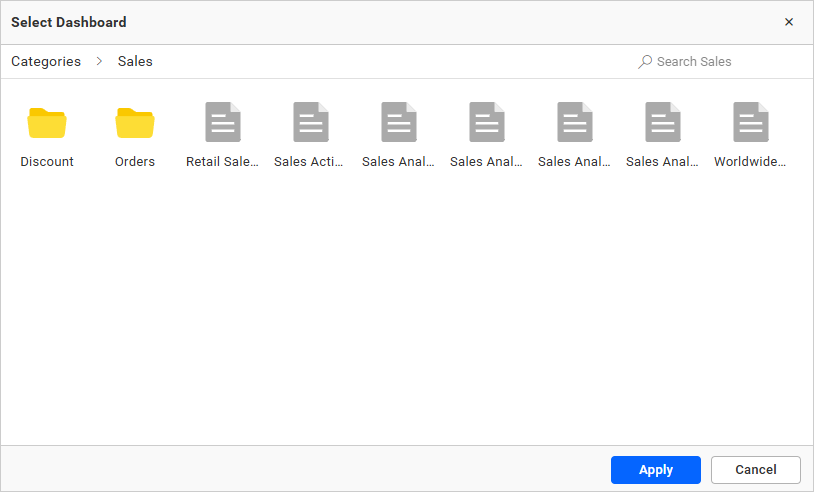
In the properties of the button widget, where you will find the “Select Dashboard” option under the “Link” category. Clicking on “Select Dashboard” will open a dialog box displaying relevant categories and dashboards based on user permissions. Users can either double-click a dashboard file to select it or choose the dashboard and click the “Apply” button at the bottom of the dialog.
Pass Filter Details
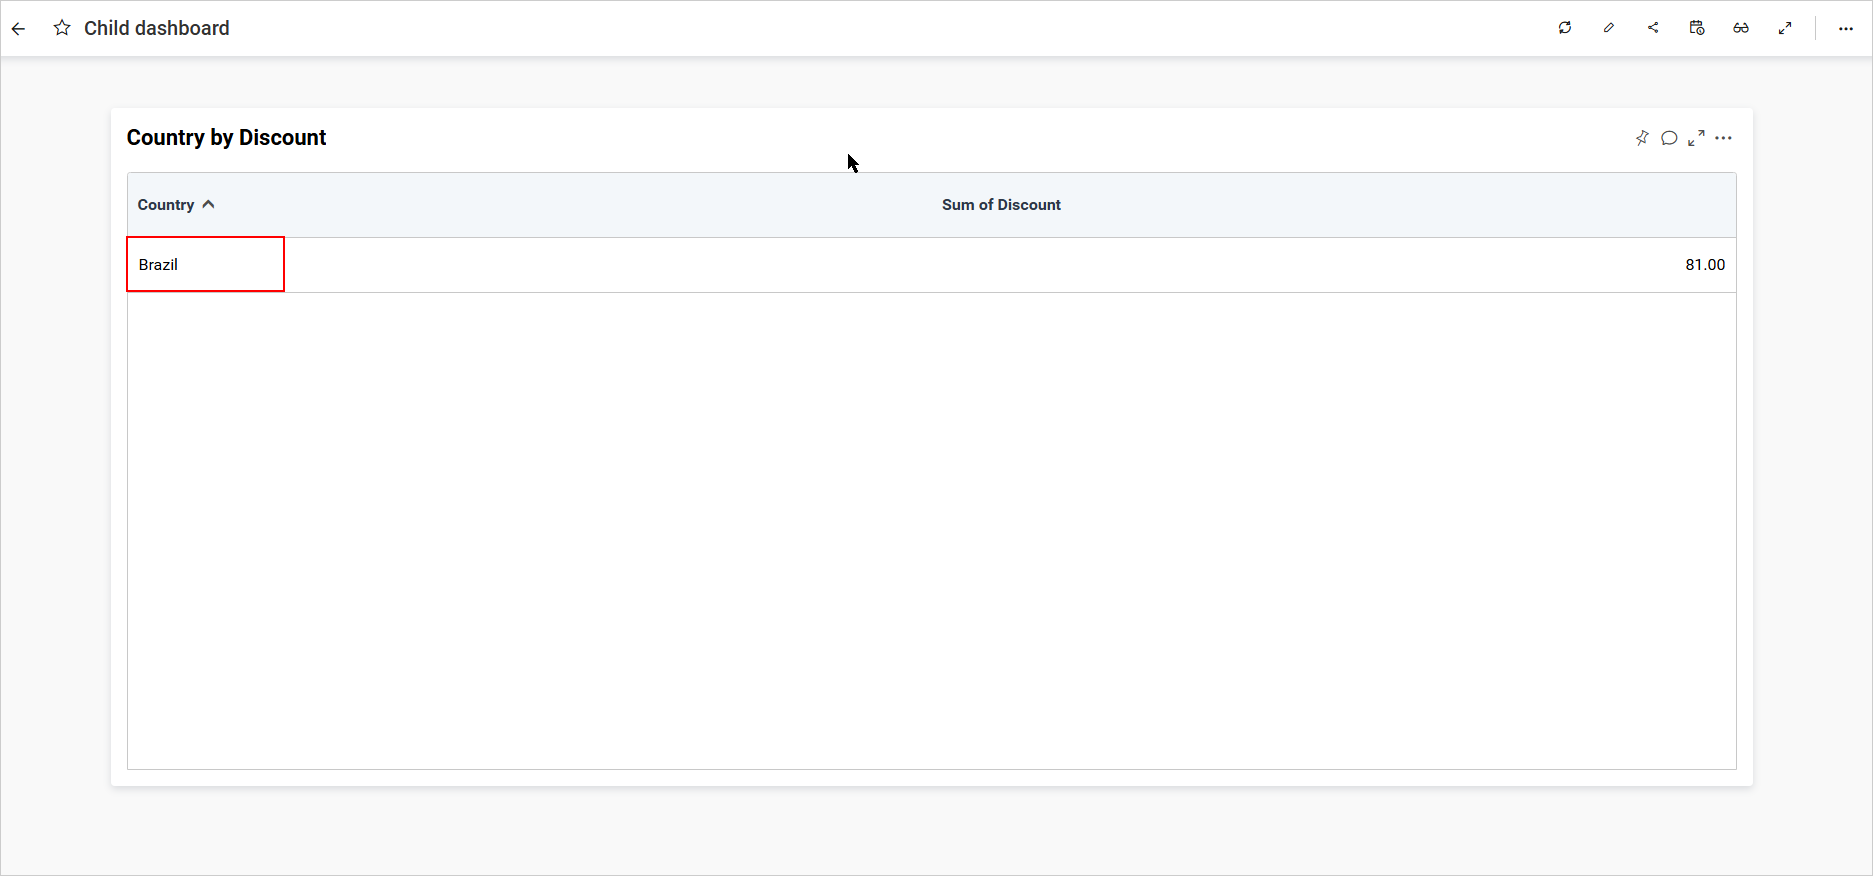
While navigating between dashboards, you can pass filter information from one dashboard to the target dashboard. For example, consider a combo box filter widget filtering the country values to Brazil. After navigation, the same filter will be applied to the child dashboard.
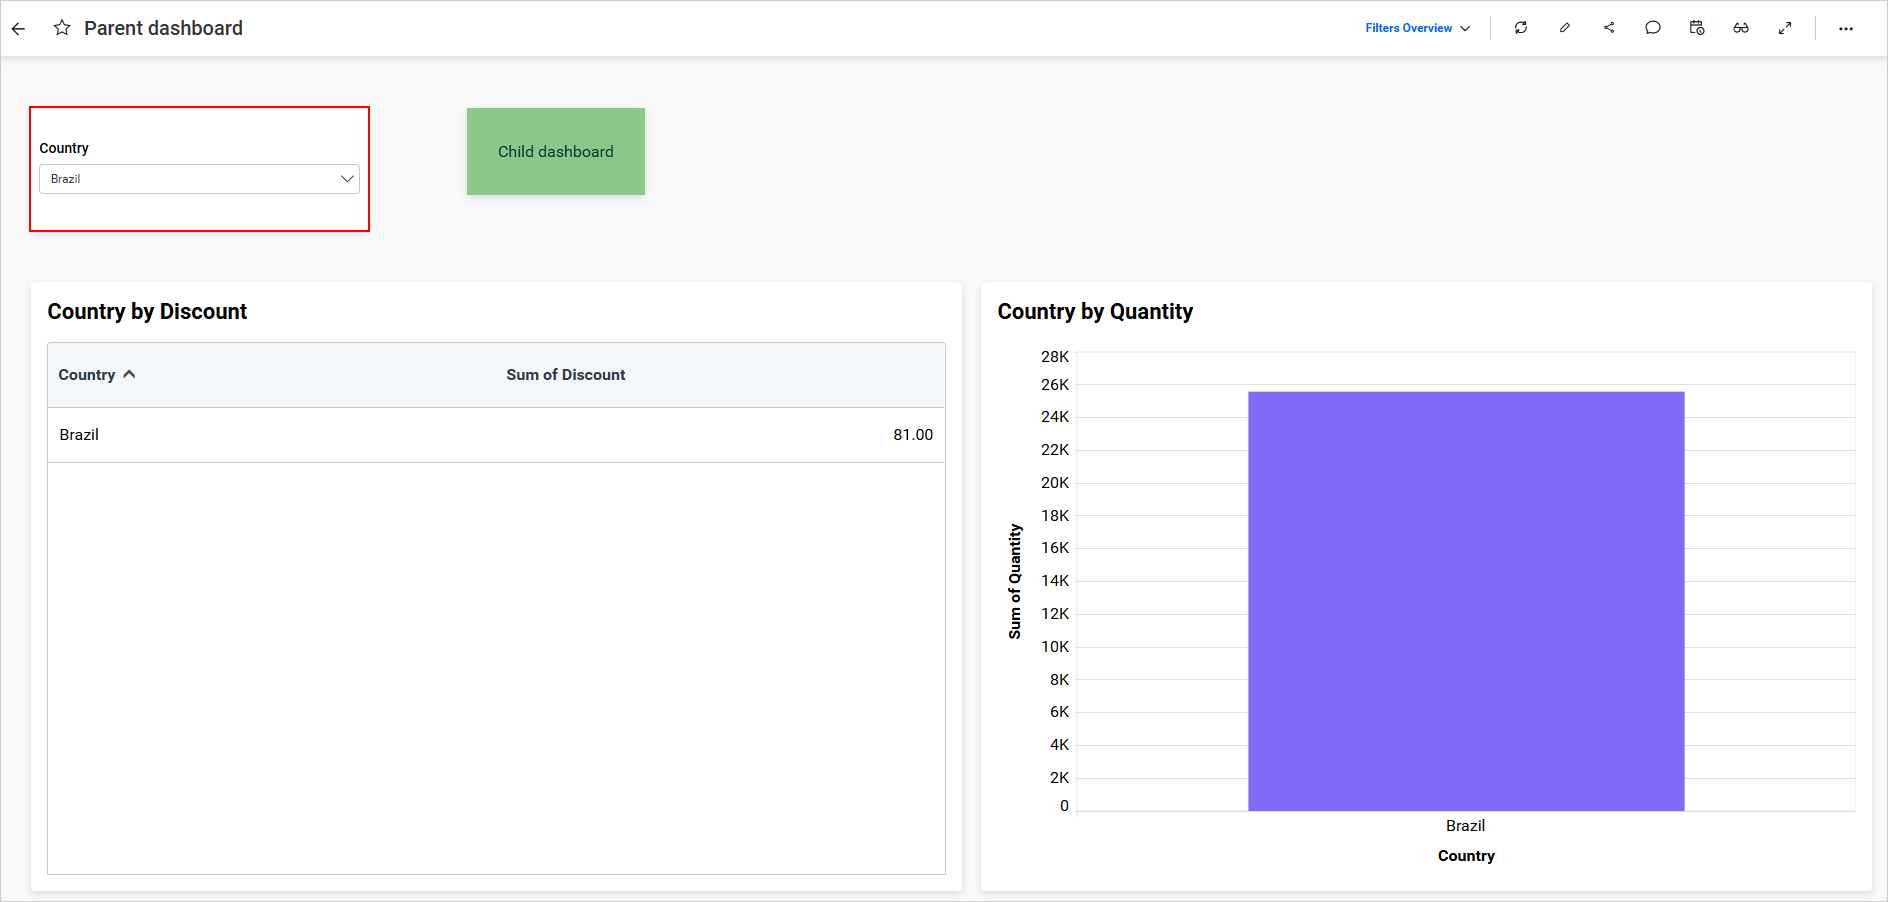
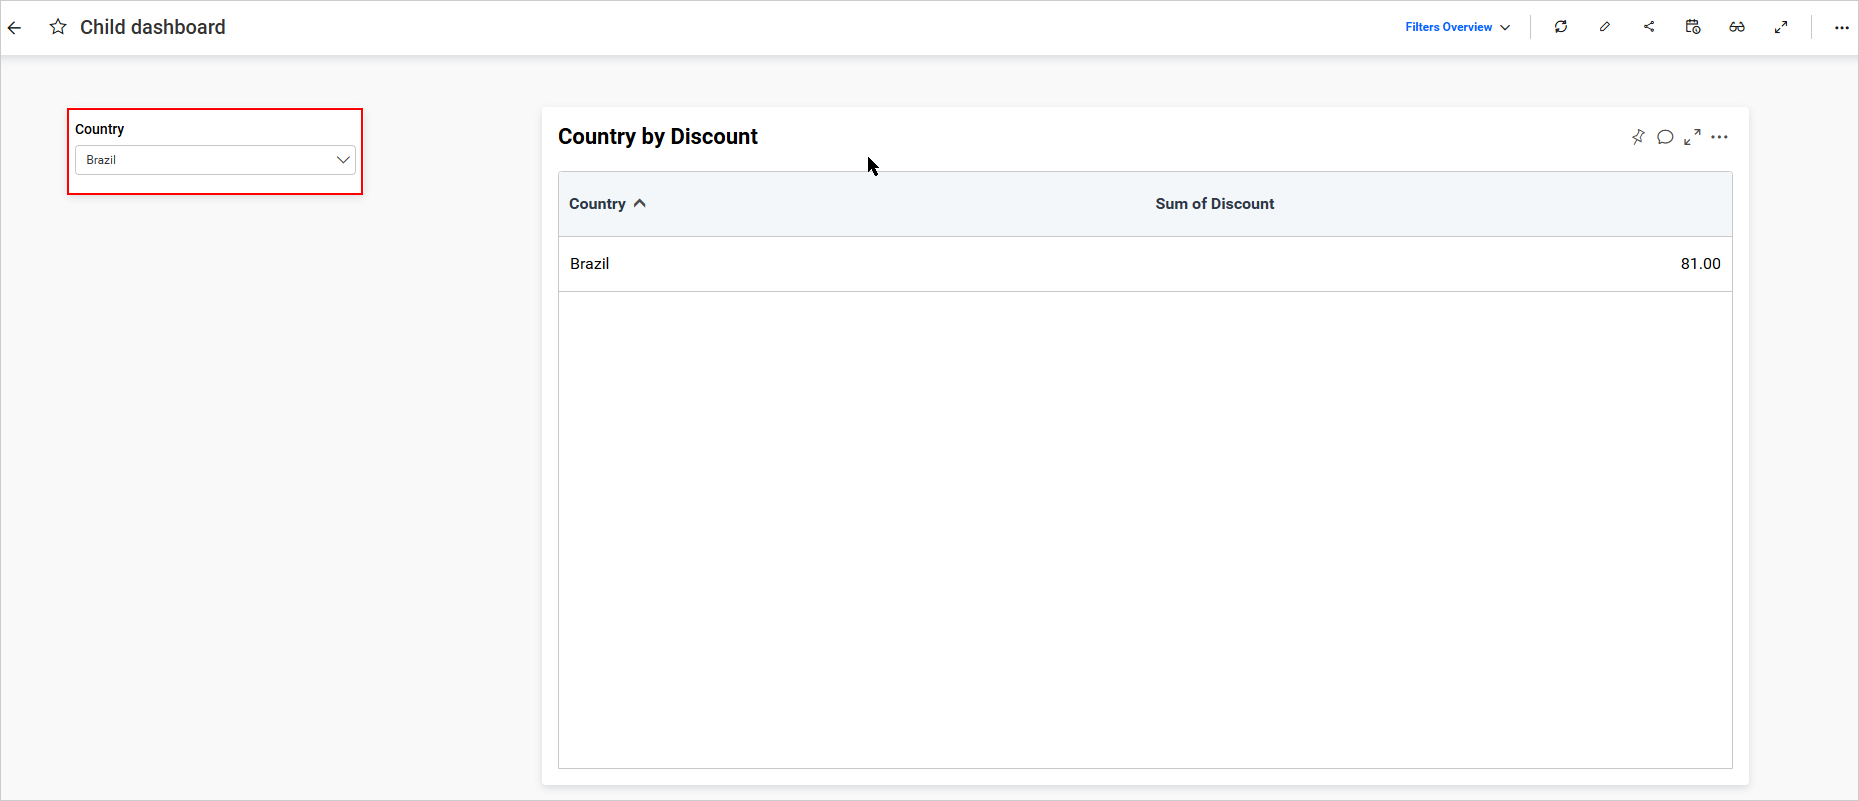
If no filter widgets are present in the child dashboard to receive filters from the parent dashboard, the passed filter will act as a URL filter to filter the child dashboard.
URL
- URL: Enter the target URL.
- Mode: Select how the URL opens—options include New Tab, Same Page, Current Frame, Parent Frame, Pop Up, or New Window.
Include Master Widget Filters
This option allows the selected filter values from the chosen master widget to be automatically passed to the navigated dashboard via the URL parameters, without the need to manually append parameters. It applies to both Dashboard and URL navigation types.
You can select the master widgets from the Choose Master Widgets dropdown. It will display the configured master widgets in the current dashboard. By default, all widgets are selected.
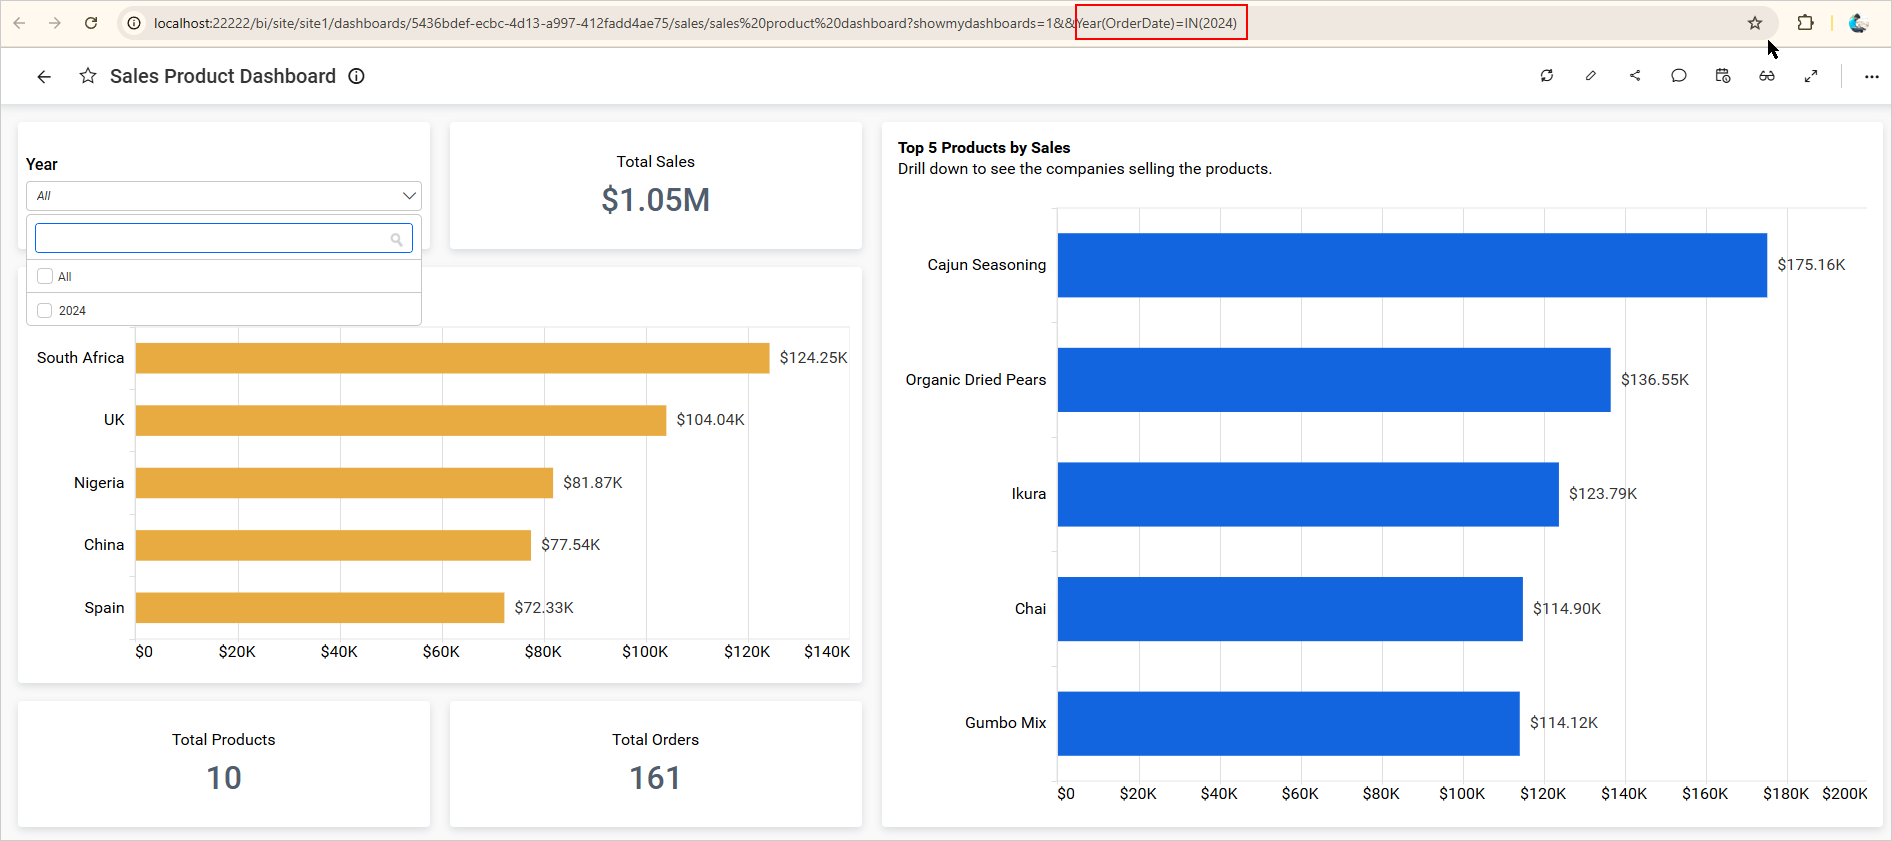
For example, in the dashboard shown below, the Year-configured filter widget is used as the chosen master widget for the slave widget, with 2024 selected as the value. Upon navigation, the selected value is automatically passed to the destination dashboard via a URL parameter.
NOTE: If the selected master widgets are not filtered, then no values should be passed to the Dashboard or URL.
Slicer Action
Starting from Bold BI v16.2.5, the Button Widget supports Apply All Slicers and Clear All Slicers actions, allowing users to control when slicer selections are applied to the dashboard.
Consider a Sales dashboard containing multiple slicers:
- Country
- Region
- Fiscal Year
You may want to select values across multiple slicers before refreshing the dashboard. Instead of triggering a refresh after every selection, they can review all filter choices and apply them simultaneously using an Apply Filters button. Likewise, a Clear Filters button can be used to reset all slicer selections with a single click. This approach helps reduce unnecessary dashboard refreshes and improves usability, especially when working with multiple filter controls.
By adjusting these settings, the Button Widget can be tailored to effectively meet specific needs and enhance user experience.
This widget will be available on the release of version 7.11.24.
Additional References